Preserving Summer

I am determined not to let any of my farmer’s market finds go to waste this summer. Anything that can’t be eaten while still fresh has to be converted into a form that will last, preferably something I can keep and revive in the dead of winter when I’ve had my fill of root vegetables. I spent yesterday in the kitchen, applying my preserving skills to some seasonal produce.

Strawberries:

What to do with two quarts of local strawberries when you already have a half dozen jars of strawberry preserves? Make ice cream and sorbet. Both products begin the same way, only deviating in preparation just before freezing. I used recipes from David Lebovitz’s The Perfect Scoop, and began with strawberry sour cream ice cream. I rinsed, hulled, and sliced a pound of strawberries and measured out 150 grams of sugar and a tablespoon of kirsch. (Pro tip: use a star-shaped pastry bag tip to core out the berries.)

I mixed the berries with the sugar and kirsch, stirred to dissolve the sugar, then let the berries macerate at room temperature for an hour in a covered bowl. I stirred about every ten minutes to make sure the sugar was dissolved. I started a second bowl for the sorbet half an hour after the first, so my processing steps would be staggered. When the berries were ready, I measured out a cup each of sour cream and heavy cream.

I puréed the berries and creams in a blender along with a squirt of fresh lemon juice, stopping while there was still a bit of rough texture to the mix.

For the sorbet, I puréed the macerated berries along with some lemon juice and a pinch of salt, then passed the mixture through a fine mesh strainer to remove the seeds.

I chilled the ice cream base for an hour before churning in my ice cream freezer; the sorbet base chilled overnight before freezing. The results are what you see at the top of the post: a his-and-hers dessert for me and She Who Must Be Obeyed. I loved the richness and tang of the ice cream, but the sorbet was right on the money; not too sweet, tasting of nothing but strawberry essence.

Freezing is definitely preserving, but I don’t expect the results to last more than a week or so.

Jalapeños:

Because I can’t grow anything in the weed patch that passes for my back yard (dogs, skunks, and thieving passers-by make that impossible), I have an AeroGarden hydroponic setup in the Belm Utility Research Kitchen. I have used it in the past to grow the lettuce for my 100% homemade BLT, but I used it most recently to try growing jalapeño peppers. Due to a catastrophic failure of the plants as they were at the height of pepper production, I had to harvest everything at once, leaving me with more peppers than I could comfortably cook with at one time. After asking for suggestions as to what should be done with my sudden windfall, I settled on pickling most of them, and since I was already in that groove, making sorbet out of a few of the still-green specimens. (It only took two comments to have jalapeño jelly suggested to me. Who eats that stuff, and what is it good for?)

Pickling was simple: I cut two lengthwise splits in each pepper, added spices (two garlic cloves, four peppercorns, two allspice berries, and half a bay leaf ) to a pint mason jar, and measured out a cup each of water and white vinegar.

While I brought the water, vinegar, and a teaspoon of salt to a boil, I packed the peppers into the jar, which I then filed almost to the top with the hot solution. I layered a tablespoon of olive oil over the top, then capped the jar with a band and lid. I set the jar in a pot of boiling water and let it process for ten minutes. After cooling, my pickled peppers were ready:

I seeded and diced the remaining four peppers, then measured out two cups of water, a cup and a quarter of sugar, and a tablespoon each of vodka and lime juice.

I combined the water and sugar, and heated until the sugar was dissolved. I added the diced jalapeños, and let the mixture infuse until it reached room temperature. Once cooled, I puréed it in the blender with a pinch of salt.

I let this base sit overnight as well, then churned it in the morning.

It’s sweet, but it also has a delayed burn after a few seconds. I plan on using it as a garnish in bowls of summer corn soup, but I have to wait for the fresh corn to show up.

Garlic Scapes:

I only discovered garlic scapes – the flowering shoot from garlic bulbs – last summer. Farmers cut the curly shoots off to promote larger bulb growth, and sell the scapes during their very short season. They can be used like chives or scallions, but obviously have a garlicky flavor. I noticed that the straighter end closest to the bulb has a texture similar to raw green beans, which gave me the idea of pickling them.

I didn’t take any intermediate photos of the pickling process, which was pretty much the same as for the jalapeños. The spice mixture was different: a large handful of dill, a garlic clove, and a quarter teaspoon of kochukaru (I was out of cayenne). I had enough to fill two pint jars, which I processed along with the peppers:

I reserved a large bunch of the scape tops in the fridge (they’re a favorite omelette addition), then vacuum-sealed the rest in two bags which are now in the Deep Storage Facility.

A few hours of easy work allows me to extend my summer well past the time when its benefits are available. Not a bad trade-off.

Preserving Summer on Punk Domestics
Posted in food & cooking, Uncategorized | Tagged , , | 9 Comments

Breadapalooza

After three previous attempts at baking my own bread, I was beginning to think it was something I’d just never figure out. As recently as two weeks ago I tried again using leftover whey from my mozzarella making in the place of water in my bread formula. The first loaf was OK, but still had a very uneven air bubble distribution, The second loaf, made from dough that had been allowed to sit in the fridge for a few extra days looked promising if a bit flat:

However, when cut open, it was too dense at the bottom:

Just as I was resigning myself to giving up on the whole idea of bread baking, I got an email from Andrew, my exceedingly patient bread consultant, announcing that he would be teaching a class at his home. I offered to trade an immersion circulator for the lessons, and we had a deal. I would be one of five students attending the class.

I arrived at his home on Saturday aftrenoon just as he was taking this beauty out of the oven, a focaccia with mushroom confit, basil, and cheese:

Having established his credentials and upped the intimidation factor with one gesture, he walked us through every aspect of bread baking. He had dough that he prepared earlier that he would use to demonstrate different techniques, but we also had to make our own “straight” dough with flour, water, yeast, and salt.

Mixing together everything but the salt produced this shaggy mess:

This mixture would rest for 20 minutes, allowing the enzymes in the flour and yeast to develop flavor, a step called the autolyse. The salt was added, and the dough rested, covered, until it was time for the fold and stretch step, which would be repeated every thirty minutes for a few hours. The dough isn’t kneaded, but the folding and stretching breaks some of the larger air bubbles and aligns the gluten. Here’s the envelope fold being applied to a larger batch of dough:

Between folds and rises, I learned about every factor that could influence the final outcome. I already knew about hydration levels and baker’s percentages, but calculating the desired dough temperature was new to me. You need to measure the temperature of each dry ingredient, factor in the amount of friction generated by the mixing method, and then add the water at a temperature that will result in dough at 75 to 78 °F, the optimal fermentation temperature. Ignoring that factor had been one of my biggest mistakes.

After a demonstration of the crucial shaping technique – almost impossible to describe, but simple to understand once you’ve seen it – we moved on to scoring the loaves. This is where I discovered mistake number two: I wasn’t scoring the dough deeply enough. Look at the depth of the cuts on these three loaves:


They were baked on a stone on the oven, with a pre-steam before they went in and more steam added after about five minutes. The steam source was boiling water poured over pans of ceramic pellets that had been pre-heated along with the stone.

Andrew was kind enough to give us each a bag of the pellets to take home, but they can be found at any hydroponics supply store.

After about 45 minutes at 450 °F, the loaves were ready:

Although you should always wait a few hours for the bread to cool before cutting it (the carryover heat finishes cooking the center of the loaf), the bread was cut open to show the even texture.

The class was over at this point, and we were all sent home with a bag containing the dough we had been folding and stretching. Once home, it would need a final shaping and proofing, and then it could be baked. I shaped my dough and set it in a floured banneton to rise.

After the proof, I inverted the dough onto a peel and scored it – deeply – before sliding it onto the oven.

Wait, I hadn’t boiled the water to make the steam! The five minutes that elapsed while I steamed the oven were enough to let the dough spread a bit, but I was committed. Into the oven it went, and, after 45 minutes and two more steam additions (gas ovens vent out the water vapor) I pulled out this loaf:

It was already late in the day, so I waited until the next morning to cut it open, which you can see at the top of this post. Good crust, even crumb, reasonably uniform air bubbles – all that was left was to taste it. I called in my bread tasting expert, She Who Must Be Obeyed, who passed judgment: “It’s your best loaf yet.”

So I’m back in the bread-baking business, and will keep practicing until I can routinely turn out uniform loaves. And very soon I’l incorporate the starter I was given to make pain au levain.

Posted in food & cooking | Tagged , | Comments Off on Breadapalooza

Cheesy Comestibles

My first attempt at cheese making was successful, but it was also the simplest of techniques. I decided to up the ante and make a hard cheese, cheddar, “the single most popular cheese in the world.” I still had three methods – farmhouse, stirred curd, traditional – to choose from, with the farmhouse method being both the least complicated and having the shortest time to a finished product.

I needed two gallons of pasteurized (not ultra-pasteurized) milk, which was available in bottles. When I was a wee lad, my first household chore was retrieving the half gallon milk bottles that were delivered to our milk box each morning. Those bottles had plastic handles, unlike their modern equivalents.

I poured the milk into a heavy pot, which I lowered into a sink full of water at 100 °F.

When the milk reached 90 °F I added a packet of direct-set mesophilic starter, covered the pot, and let the milk ripen for 45 minutes. The starter contains the bacterial cultures that will ferment the cheese as it ages.

I uncovered the pot, added a half teaspoon of liquid rennet (much easier to work with than tablets) dissolved in a quarter cup of water, and gently stirred the milk for a minute. I drained some of the water from the sink, added more 10 °F water, and let the milk set for another 45 minutes. When the curd had formed, I cut it into half-inch cubes.

For the final heating step I added 110 °F water, which would raise the temperature of the curd to 100 °F over about thirty minutes. I stirred the curds to keep them separated and watched them slowly release whey.

After giving the curds a five minute rest in the covered pot, I transferred them to a colander lined with cheesecloth. (Real cheesecloth is sturdier and has a finer weave than the stuff you find in cooking stores.) I tied the corners of the cheesecloth into a bag and hung it over the sink, letting the curds drain for an hour. I now have a bungee cord attached to the cabinet over the sink, which I’m sure will be a future conversation starter.

The drained curds formed a solid mass which resembled a huge blob of mozzarella.

I broke the mass into smaller walnut-sized pieces, a process the pros call “milling.”

After salting the milled curds with a tablespoon of fine salt, I packed them firmly into a cheesecloth-lined mold (a plastic tube perforated with fine holes).

I covered the top of the curds with another piece of cheesecloth, then added the follower (a disc-shaped top for the mold) before adding ten pounds of pressure. I don’t have a professional cheese press, but I discovered that a 28-ounce tomato can fits exactly inside the mold. Two cans, plus one of the bricks I use for pressing terrines, added up to ten pounds. I set the rig over a drip tray to catch the remaining moisture that the salt was drawing out of the curds.

After ten minutes, I removed the cheese from the mold, and peeled away the cheesecloth. The curds were more densely packed.

I inverted the curds, re-wrapped them in the cheesecloth (“re-dressing”), and placed them back in the mold, to which I applied twenty pounds of pressure: the same rig as before, with an additional ten-pound weight (snatched from She Who Must Be Obeyed, who uses it for sit-ups) added.

After another ten minutes, I repeated the procedure with a shorter, denser curd mass.

One more inversion and re-dress, and it was time for the final press, fifty pounds for twelve hours. A cinderblock (you have those lying around, don’t you?) plus two bricks plus a tomato can totaled 52 pounds. I had to push the assembly agains the wall to provide stability – notice the level, which I used to make sure the curds would be pressed evenly. I wanted to avoid a cheese with a sloping top.

After an overnight stay in the press, I unwrapped the cheese, which is what you see at the beginning of this post. I set it on a bamboo mat resting on an old cutting board, and let it dry for two days, rotating the cheese every four hours to promote even drying. As the drying progressed, the cheese developed a yellow rind and a dry exterior.

I melted a block of cheese wax in a metal bowl over a pot of boiling water, writing off the bowl as the permanent wax receptacle.

I brushed the wax over the cheese, making sure I didn’t leave any air voids where mold could grow. After a few coats I added a label with the kind of cheese and the date it was made.

I stored the finished cheese in the Belm Utility Research Kitchen Aging Cave (an old mini-fridge retrofitted with an external thermocouple-regulated temperature controller), where it will age for at least a month. You can see the hygrometer/thermometer at the upper right, it shows the internal temperature as 53 °F and the humidity at 62%. I’ll flip the cheese over once a day to prevent condensation from forming on the bottom.

If I’m patient enough, I’ll wait two months before trying it, but I suspect I’ll give in before then. I might come over all peckish, esurient, hungry like, but at least there will be some cheese and not the situation Mr. Mousebender found himself in with Mr. Wensleydale.

Sources:

Milk: Thatcher Farm
Mesophilic Starter, rennet, cheesecloth, wax: New England Cheesemaking Supply Company

Cheesy Comestibles on Punk Domestics
Posted in food & cooking | Tagged , | 10 Comments

Eat Them Up Yum

When I saw these three salmon heads poking out of the ice at the fish counter at the Stop & Shop (with the radio on), I though of two things:

Thing the first:

I remembered this post from Ideas in Food, a rethinking of  head cheese. There is a lot of tasty meat in an animal head, and a fish head has the added bonus of consisting of more cartilage than bones, which ups the gelatinization potential.

The preparation was dead simple. I started by brining the heads in a five percent salt solution for ten minutes to remove some of the blood.

Since the Belm Utility Research Kitchen still lacks the CVap oven I’ve been hinting about, I put the heads in my steamer and cooked them for about 20 minutes.

I let them cool a bit while they stared at me with those dead, empty eyes. (They still haunt me, those eyes, my dreams… Sorry.)

I picked all of the meat and fat off the heads, then prepared a seasoning mix of equal parts salt, garlic powder, onion powder, black pepper, and piment d’Espelette. I also readied some white truffle oil and light soy sauce (I couldn’t find white soy sauce anywhere in the area).

I mixed everything together while it was still warm, then pressed it into a square plastic container and covered the top woth plastic wrap.

After an overnight chill in the fridge it was ready to try.

Unlike my previous head cheese disasters, this version sliced beautifully and held its shape at room temperature. The seasoning was just right, spicy but still allowing the salmon taste to come through. I don’t know how often I’ll get to make this, but I’ll keep my (undead) eye open for more fish heads.

Thing the second:

I can’t imagine living without having a huge selection of music to listen to, and knowing that there is a world of music still out there for me to discover still excites me. I know that my voracious consumption of music is not the norm, there must be people who have absolutely no desire to listen to music. Somewhere between those polar opposites are people who listen to a very narrowly defined subset of possible musics. I have met a few of these people, and they have all gravitated to novelty songs, the tunes you could hear on Dr. Demento‘s radio show.

I hate novelty songs. They have a third-grader nyaah nyaah quality that makes me feel like steel needles are being driven through my skull. The lyrics are equally puerile, although devotees quote them as you or I might quote Shakespeare or Milton. I know more about this music than I want to because I shared an apartment with a Demento fanatic. He taped the shows every Sunday evening and played them every day until the next show was broadcast.

What does this have to do with salmon head cheese? As I worked at picking meat from bone, then mixing the spices to make the terrine, I kept hearing THIS GODDAMNED SONG, my ex-roommate’s absolute favorite:

http://www.youtube.com/watch?v=cTpUVAcvWfU

It’s stuck in my head again, after an almost 30-year absence. I think a week-long course of Norwegian black metal will be the only thing to kill the dreadful earworm. Wish me luck.

Eat Them Up Yum on Punk Domestics
Posted in food & cooking | Tagged , | 9 Comments

Evening at the Improv

I don’t always have a week’s worth of meals planned out in advance. Sometimes I get so immersed in work that I forget I have to put a meal on the table at the end of the day. Recently I have been treating those unplanned days as opportunities to improvise with what I have available.

Wednesday was one of those days. A quick survey of the Deep Storage Facility and the fridge turned up frozen lamb rib and loin chops, chicken stock, fava beans, and large-grained couscous. Thanks to recent research by Harold McGee, I was able to thaw out the chops quickly. While they came up to temperature I scrounged up a few more ingredients: mint, pomegranate juice, pomegranate vinegar, and harissa.

I rubbed the chops with harissa and salt, and let them marinate while I boiled the stock and started the couscous.

I poured the pomegranate juice into a pan and boiled it to reduce, tossing in a few mint sprigs to infuse their flavor. I blanched and peeled the favas, then chiffonaded some more mint. When the couscous was al dente, I tossed in the mint and favas and kept the mixture warm while I heated up a grill pan.

I grilled the chops, then removed the mint sprigs from the pomegranate reduction, correcting the acid balance with a splash of the pomegranate vinegar.

As the chops rested, I loosened the couscous with a splash of lemon-infused olive oil. Plating was simple: chops on top of the couscous, pomegranate syrup drizzled around the outside, and a few baby mint leaves for garnish.

Lamb, Pomegranate, and mint is a classic combination, but the addition of the harissa made the whole dish pop. I had been thinking about these flavors for a while, so this dish served as a dress rehearsal for something a bit more ambitious: butterflied boneless lamb leg, rubbed with harissa and cooked sous vide, then finished on the grill. I’ll let you know how that turns out.

Sources:

Lamb: Stillman’s
Harissa: See Smell Taste
Pomegranate Juice: POM Wonderful

Posted in design | Tagged , | Comments Off on Evening at the Improv

I Don’t Have to Show You Any Stinking Badges!*

Iwas a Boy Scout, but I never worked my way up the ranks to Eagle scout. That achievement required at least 21 merit badges, a few of which (swimming, lifesaving) were mandatory requirements completely beyond my physical capabilities. It should come as no surprise that I did acquire the cooking merit badge before I gave up on Scouting:

Years later, while reading the Starstruck comics, I was introduced to the fictitious Galactic Girl Guides, a galaxy-spanning network of con artists and grifters whose ranks were filled with young girls. When they weren’t selling Triangle Mint cookies (“Looks like a triangle, tastes like a mint!”), they were working on earning merit badges for skills like Short Con, Pickpocketing, Gambling, and other unsavory activities. I particularly liked their Forgery merit badge, which required the Guide to successfully forge a Forgery merit badge in order to earn it. The self-referentiality of the joke stuck with me long after I had forgotten the rest of the story.

When the Nerd Merit Badges became available I purchased all that I could claim applied to me.

From left to right: Family Help Desk, Inbox Zero, Rubber Duck (“Solved problems by standing there and nodding.”), Homonyms (“Correctly spell words that sound the same”), Been Boinged (“You’ve had a project mentioned on the Great Big Blog!” Yup, I have.), and Printer Hero (which, ironically, has a misprint on its letterpressed heavy card stock holder).

When I saw this post on BoingBoing, I knew I had to have this merit badge; it had that self-referentiality I remembered from the Forgery badge. I’d be able to say “I bought this ‘Bought This Bitcoin Badge With Bitcoins’ badge with Bitcoins.” Little did I know that it would involve more work than any actual merit badge I had previously earned.

Bitcoins are the most recent attempt at establishing a secure online currency, but one that has no central issuing authority. I won’t go into details – there’s enough information online to satisfy your inner cypherpunk geek – but it’s important to note that “no major retailer accepts the currency for payment.” Like any currency, it has a trading exchange, and is subject to value increases and decreases based on the market.

I wanted to purchase two Bitcoins so I could buy two merit badges, and this is where the process got stupidly complicated. My two options were to directly trade US dollars (USD) for Bitcoins (BC) via an online forum where people were offering that service for a small fee, or to create an account at the currency exchange and buy directly. Direct trades looked like scams, so I opted for setting up an account.

None of the currency traders will let you transfer USD from a PayPal account (“They’re evil!”), so I had to set up an account with Dwolla, one of the approved also-ran online payment sites. Just like PayPal, I had to set up routing info from my bank, wait a few days to have random small deposits made into my bank account, report those amounts to Dwolla, and then wait for the new account to be authorized — a process that took a whole week. I transferred $20 to Dwolla, then went to the exchange to buy two Bitcoins, which were trading at about $8.5 USD/1 BC. Dwolla took its percentage of the transaction out of my account, and I was told my purchase was successful. I now had 1.98 Bitcoins. Why 1.98? I was informed “This is because 0.65% of commission is excluded directly from the bitcoin you bought.”, an explanation which is nowhere to be found in the exchange’s help area.

I wasn’t put of the woods yet. I had two Bitcoins, but I had to create them with Bitcoin software, which involved connecting to a distributed network and waiting for enough cycles to elapse to have my currency generated. The result was a unique key, which I mailed to the guys at Nerd Merit Badges, along with an apology for only sending 1.98 BC. Their response?

SERIOUSLY, it’s incredibly difficult, isn’t it? Hence the badge, I was just so damn proud of myself the first time I got my own hands on a couple of bitcoins.

Re: the 1.98. No problem. We will simply take a deep breath near the badges before putting them in the envelope, thereby removing a tiny fraction of their mass through sublimation and offgassing, and will send you both badges 🙂

My ordeal was over, and I received my badges a few days later. At the time I speculated that those badges were probably the only tangible goods one could purchase with Bitcoins, but I was soon proven wrong. An untraceable, distributed currency is ideal for drug trafficking, as reported here. A few days later, this story about an anonymous online market for recreational substances appeared on Gawker. Bitcoins are now worth almost $20 USD each, acquiring value through one of the great American early adopters: drugs and pornography.

I have my badges, I can make my geeky joke, but I hope I never have to use a Bitcoin again. Unless I want to score some crystal meth, which requires a type of cooking I’m unwilling to try at home.

*This is the actual quote from “Treasure of the Sierra Madre,” not “We don’t need no stinking badges!” Proof:

Posted in culture, influences | Tagged , , | 2 Comments

Duck Variations: Duck Sausage with Cranberries, Sage, and Port (Charcutepalooza Challenge 6)

As promised in a previous post, I made duck sausage to complete the June Charcutepalooza Challenge. My local gourmet provisioner makes an excellent duck sausage with cherries, which, along with mushroom risotto, was a favorite food of a certain two-year-old in our household. Ruhlman’s Charcuterie recipe uses garlic, sage, and red wine, but at the suggestion of She Who Must Be Obeyed I worked out a variation that used cranberries.

Charcuterie‘s recipe also calls for pork fat to be mixed with duck leg meat, but I figured that I’d have more than enough duck fat from boning out the legs to make the supplemental pork unnecessary. (I know, I actively avoided the use of pork fat in a recipe.) My concern was with how soft duck fat can get at room temperature, which could lead to smearing in the final grind. In response to my email query, Ruhlman suggested I could supplement the fat and skin from the legs with frozen, diced, rendered duck fat, which I had in abundance.

I retrieved my stash of duck legs from the Deep Storage Facility and began separating fat, skin, meat and bones – a process that got easier after the first eight legs – and wound up working my way through eighteen legs to get the required weights: three and a half pounds of diced meat, a pound and a half of fat and skin (just enough, no additional fat required), and a bowl full of very meaty bones.

I could have been a bit fussier about removing more meat from the bones, but I didn’t want to spend a few more hours teasing out dozens of tendons from each leg. Besides, I had another use in mind for the bones: blanched, and then simmered with onion, ginger, cilantro, coriander seeds, and fish sauce, they became four quarts of duck phở. The rendered tendons added a lovely gelatinous oomph to the stock.

While the fragrant stock simmered (quite a calming influence in the Belm Utility Research Kitchen) I cut up the skin and fat into one-inch chunks with kitchen shears and set them on a sheet tray which went into the freezer for about half an hour. If I kept the fat as cold as possible I stood a better chance of it remaining well-defined in the final grind.

I assembled the seasonings: about a cup of chopped dried unsweetened cranberries, half a cup of finely chopped fresh sage, salt, coarsely ground black pepper, and half a cup of ruby port.

I tossed the duck meat and fat together with the seasonings and let them chill again in the fridge along with the port.

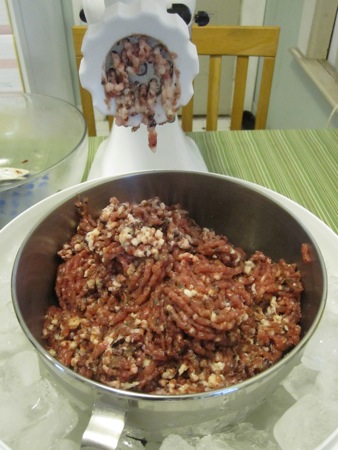
I set my mixer bowl in salted ice water and pushed the seasoned meat through the grinder.

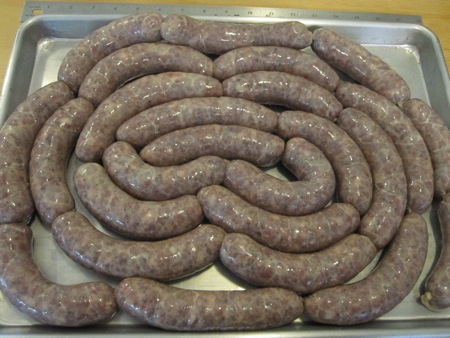
I added the port and half a cup of ice water, then combined the mixture at medium speed for a minute. I made a small patty out of the stuffing, sautéed it and checked  the meat for seasoning (spot on), and then recruited She Who for her expert sausage handling skills. Within half an hour we had twenty five links of duck sausage.

I portioned the sausages into four meals’ worth of links, keeping one in the fridge and sending the rest to the Deep Storage Facility. For dinner I cooked polenta, wilted swiss chard with garlic scapes, and made a quick sauce by reducing some duck stock with the same port and a sprig of thyme. I served the sausage over the polenta and added a healthy splash of the sauce.

I hit just the right balance with the seasonings. The sausage was sweet but not cloyingly so, tempered by the tartness of the cranberries and the earthiness of the sage. This was hearty fall fare, but still appropriate for the day’s sub-sixty-degree temperatures, simple and perfectly accompanied by a 2000 Ravenswood merlot/cab blend. He Who Will Not Be Ignored said “You kept telling me how much I used to like duck sausage. I think I like it again.”

Duck Sausage with Cranberries, Sage, and Port on Punk Domestics
Posted in food & cooking | Tagged , , , | 2 Comments

Market Caution

This summer’s market mantra is “buy only what you will use in a week.” This also implies a second rule: make sure to cook what you buy. I saw that in action this morning as I found myself following Tsei Wei and Diana from Journeyman as they filled a huge basket with produce that they planned to incorporate into the upcoming week’s menu.

I bought a huge bunch of swiss chard, some garlic scapes, a bundle of cilantro, and a pint of strawberries. All of it, with the exception of the scapes, which will be portioned out and frozen, will be gone by Monday morning.

More baked goods: banana bread, triple berry pie (tomorrow night’s dessert, accompanied by the strawberries), bagels, and two ciabatta rolls which became lunch (filled with prosciutto and homemade mozzarella). Also a bag of mixed nuts, which aren’t quite bakes goods, but seemed to fit more logically with this batch.

My day was spent in the kitchen, the results of which will be the subject of Monday’s post.

Posted in food & cooking, local | Tagged , | Comments Off on Market Caution

Fun with Wieners, or Charcutepalooza Challenge 6

I want to go on record as having decided to make hot dogs weeks before some idiot named Wiener thought he could lie about how Twitter worked. He should have “The Internet is Forever” tattooed backwards across his chest like Leonard Shelby in Memento; a permanent reminder that The New York Post will find any opportunity to run a headline like today’s “Wiener Will Stick It Out!”.

With that out of the way, on to my previously planned introduction: Most children like hot dogs; they frequently become one of the basic food groups (along with pizza, chicken fingers, PB&J, and mac ‘n’ cheese). He Who Will Not Be Ignored was no different, but his like of hot dogs has developed into a connoisseurship of meat in tube form. We made a major detour on a trip to DC in order to sample the deep-fried “ripper” dogs at Rutt’s Hut in New Jersey. I have taken him to Walter’s, the still-standing hot dog hangout of my high school days, and we have recently ventured to Worcester and Shrewsbury to sample the dogs at George’s Coney Island Lunch and The Edge, respectively. This summer’s travels will involve detours to visit all ten hot dog havens in the Connecticut Hot Dog Tour:

Closer to home we can rely on Spike’s Junkyard Dogs for a decent fix, but we are fortunate to have two excellent brands of local dogs available in supermarkets: Pearl Kountry Klub (used at Spike’s), and Kayem Fenway Franks, a recent change at the ballpark which has received He Who’s seal of approval.

This month’s Charcutepaloza challenge is to either make Italian pork sausage or poultry sausage. I made Italian sausage in February, and will be making duck and cranberry sausage tomorrow, but I wanted to make another sausage and get He Who involved in the process. What better project than homemade beef hot dogs, which are nothing more than emulsified sausages?

The Sacred Book of Ruhlman & Polcyn has a recipe for Chicago style all-beef hot dogs, so it was time to round up the ingredients: lean beef cut into one-inch cubes, beef suet diced to the same size, kosher salt, pink salt, corn syrup, dextrose, minced garlic, dry mustard, sweet paprika, ground coriander, and white pepper.

After chilling the meat and fat in the freezer for about twenty minutes, I ground them through the large die into a chilled mixing bowl. He Who alternated feeding fat and beef while I pushed. (Once he gets a bit taller, we’ll switch jobs.)

The first grind was returned to a tray in the freezer for another twenty minutes (it’s vital to keep everything as cold as possible to prevent the emulsion from breaking). The meat and fat – along with crushed ice – was then re-ground through the small die, where it began to take on the characteristic pink hot dog color.

He Who added the the spices and salts:

Here’s where things got difficult. I have a four-quart mixer, which has been adequate for the previous sausage making attempts, mostly due to the low speeds required to thoroughly mix the ingredients. The hot dog mixture need to be completely emulsified to produce the smooth texture you would expect. Once I started mixing, the stuff took on the consistency of thick cake batter, and when I cranked up the speed to high – as required by the recipe – I was in danger of splattering hot dog filling all over the Belm Utility Research Kitchen. I was able to avert disaster only by cupping my hands over the top of the bowl, but I was concerned that the heat of my hands would warm up the emulsion and cause it to break. I reduced the mixing time from five to three minutes, figuring a slightly grainier texture was better than no hot dogs at all.

From this point on it was business as usual. I wrapped a tablespoon of filling in plastic and poached it to check the taste and possibly adjust the seasoning (not necessary). He Who turned the crank on the stuffer, and She Who Must Be Obeyed guided the filling into the casings. We would up with nine six-inch hot dogs.

After an overnight rest in the fridge and two hours of cold smoking over oak chips, the dogs took on the expected color. I used a sterilized pin to pop the air pockets that formed (probably due to the grainier texture).

The final step was a poach in 160 °F water until the internal temperature reached 140 °F, about half an hour.

After a chill in ice water, I sealed three dogs each in vacuum bags and stored them in the fridge until needed. For the first taste test, I steamed the dogs and served them New England style: with chopped onions and chili (more like a sweet, chili-flavored, loose meat sauce than an actual chili), on a top-split roll toasted in butter.

You could hear the snap as we bit onto the dogs, but none of us were prepared for the gush of juice that accompanied that first bite. The seasoning was spot-on, a good balance of garlic, mustard, and paprika. The chili sweetness and the onion bite complimented, rather than overpowered, the dog. He Who passed final judgement: “This is a great dog, but the next time…”

I knew what “the next time” meant, and produced variation 2 – the bacon cheese dog – a few days later…

…which led logically to variation 3, the chili cheese dog (Variations 2 & 3 were served on denser buns – the classic bun dissolved after absorbing the juice.)

These dogs are definitely worth the effort. He Who learned a lesson about how his favorite food is made, and I learned that if I intend to make hot dogs again I’m gonna need a bigger mixer. The purchase of which, like the sausage stuffer, She Who has already authorized. I love it when a plan comes together.

Sources:

Beef: Stillman’s
Beef suet: Belm Utility Research KitchenDeep Storage Facility
Hog Casings: The Sausage Maker

Fun with Wieners on Punk Domestics
Posted in home | Tagged , , , | 11 Comments

Coffee and Donuts

Saturday evening’s dinner ended with this dessert, a bit of kitchen improv inspired by Thomas Keller’s famous “Coffee and Doughnuts” from the French Laundry. A Facebook friend had posted a comment about making glazed donut ice cream – an idea that’s obvious once you see it written down – which prompted a trip to the corner Dunkie’s (it’s half a block from the police station) for a half dozen of their finest glazed treats. (I assume my LA-based friend used something more local like Winchell’s.)

I grabbed some milk and cream on the return trip and was ready to go. I heated a cup each of the milk and cream, dissolved a half cup of sugar (reduced from the usual three quarters cup, accounting for the glaze that would go into solution), and added four whole donuts to steep.

After about half an hour and a few pokes with a spatula, the donuts turned into sludge, which I strained out of the dairy base. Did I sample the remaining sludge? You know I did. Mmm… donut sludge… .

I reheated the mixture, tempered six egg yolks, returned everything to the pot and cooked the custard.

It was standard ice cream procedure from that point on: add the custard to another cup of cream chilling in an ice bath, stir until cooled, refrigerate overnight, then churn in an ice cream machine.

I had ice cream ready a few days in advance, but how would I serve it? I knew I should accompany it with something coffee-flavored, but it took another day to realize that a coffee gelée would provide an interesting contrast.

I made the gelée with a cup of brewed coffee, a cup of water with two tablespoons of sugar dissolved in it, a half teaspoon of vanilla extract, and three sheets of gelatin bloomed in ice water.

After stirring everything together, I ladled about half a cup of the gel into bowls and let them sit in the fridge to set.

I needed one more component, something with a bit of crunch. I had some chocolate tart dough left from the birthday dinner, so I planned to roll it out, bake the sheet, and cut it into irregular shapes to use as a garnish. I abandoned that idea when our guest arrived with two boxes of macarons:

Chocolate on the left, Starbucks caramel macchiato on the right (certified as accurate by a Starbucks barista) – I had a new garnish for the plate. To assemble this do-ahed dessert. I placed a scoop of ice cream on the gelée, topped it with some chocolate-covered roasted cacao nibs, leaned a macaron against the ice cream, and added a dusting of dry caramel (the gift that keeps on giving).

Lots of different textures; donut flavor balanced against coffee, chocolate, and caramel; bitter cacao and gelée against sweet ice cream – this dessert had it all going on. It’s a keeper, but, sadly, I’ll have to revert to the chocolate crisps because we inhaled all of the macarons.

One thought kept running through my head as I ate:

[podcast]http://blog.belm.com/belmblog/audio/donuts.mp3[/podcast]

Apparently not.

Sources:

Donuts: Dunkin’ Donuts
Milk, cream: Sherman Market
Cacao nibs: Taza Chocolate
Macarons: Maggie’s Creations Pâtisserie

Posted in food & cooking | Tagged , , | Comments Off on Coffee and Donuts